
Throw 50,000 <div>s at a browser and watch it choke. List virtualization is the fix — and it’s simpler than it sounds. This guide builds the technique from zero in plain JavaScript, explains every step like you’ve never seen it before, and shows you how production libraries like react-window and TanStack Virtual use the exact same idea.
⚡ Quick Answer
List virtualization (also called virtual scrolling or windowing) renders only the rows currently visible on screen as real DOM elements — typically 15–20 nodes, regardless of list size. As the user scrolls, those same nodes are repositioned and filled with new data, instead of creating thousands of new elements. The result: a 100,000-row list with the same DOM cost as a 15-row list.
📋 Table of Contents
- The Problem: Why Big Lists Hurt
- The Core Idea in One Diagram
- Step 1 — The Scrollable Container
- Step 2 — The Spacer That Fakes the Full Height
- Step 3 — The Maths: Which Rows Are Visible?
- Step 4 — Render Only the Visible Slice
- Step 5 — Position Each Row Absolutely
- Step 6 — Re-render on Scroll
- Step 7 — Overscan: The Smoothness Buffer
- The Complete Code
- Live Demo — 100,000 Rows
- When to Use a Library Instead
- When You Don’t Need This at All
- FAQ
The Problem: Why Big Lists Hurt
The obvious way to show a list of 50,000 items: loop through the array, create a <div> for every item, and append them all to the page. It works — until the browser grinds to a halt.
Every DOM node costs the browser memory, layout time, and paint effort. With 50,000 nodes, the browser is tracking, laying out, and painting all of them simultaneously — even though a typical screen can only physically show 10–20 at once. The other 49,980+ are invisible, doing nothing useful, but still consuming resources.
Imagine a library with 50,000 books. Instead of shelving them, you drag every single book out and stack them on one enormous table. You can only read the top 15 books anyway — but you’re carrying the weight of all 50,000. That’s what your browser does when it renders every row. List virtualization says: put the books back on the shelf and only pull out the ones being read right now.
The Core Idea in One Diagram
The whole technique rests on one insight: only create DOM elements for rows the user can actually see. Everything else stays as data in a JavaScript array — weightless, zero cost to the browser.
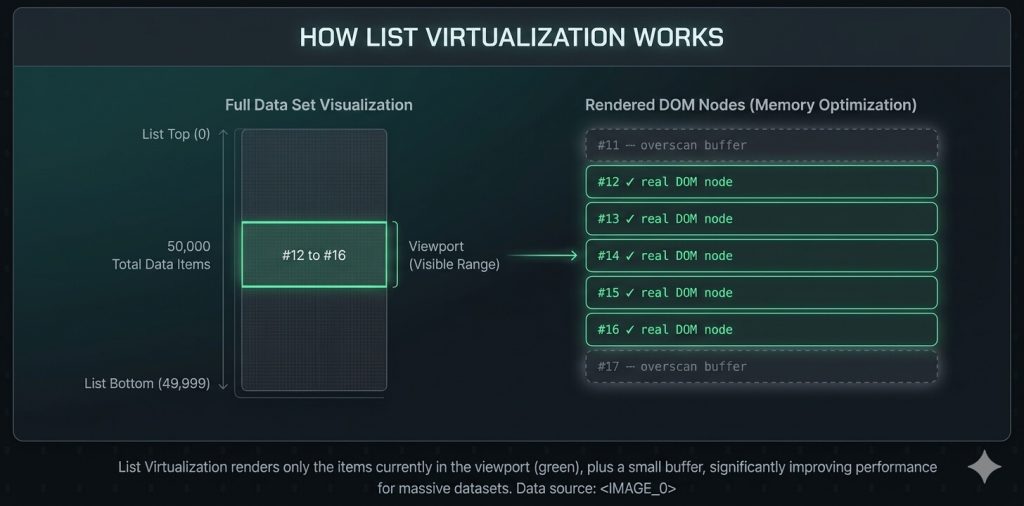
To make this work we need to answer four questions, one step at a time:
- How do we give the scrollbar the correct total height when most rows don’t exist yet?
- Given the current scroll position, which row index is at the top of the screen?
- How many rows fit in the viewport, so we know where the visible range ends?
- How do we place our handful of real rows at the correct vertical position, as if everything above them were rendered?
Each step below answers one of these.
1. The Scrollable Container
Every virtual list needs a fixed-height outer element with overflow-y: auto. This is the “window” the user scrolls inside — its height never changes regardless of list size.
<div id="list-container"></div>#list-container {
height: 400px; /* fixed viewport height */
overflow-y: auto; /* makes it scrollable */
position: relative; /* needed in Step 5 for absolute row positioning */
}2. The Spacer That Fakes the Full Height
Here’s the first non-obvious part. If we only put 15 real rows inside the container, the scrollbar will think the content is tiny — because as far as the browser knows, there are only 15 rows. We need to trick it into showing a scrollbar sized for 50,000 rows.
The solution: add one invisible <div> whose height equals total items × row height. It takes up space without rendering anything visible. The scrollbar now correctly represents the full list.
const ITEM_HEIGHT = 48;   // every row is 48px tall
const ITEM_COUNT  = 50000;

const container = document.getElementById('list-container');

// This div's only job: make the scrollbar the right size.
// It has no visible content — it's just height.
const spacer = document.createElement('div');
spacer.style.height = (ITEM_COUNT * ITEM_HEIGHT) + 'px';
container.appendChild(spacer);Think of a completely see-through window blind, fully rolled down. It doesn’t show a picture — it just takes up vertical space. The scroll indicator on the side now correctly shows “this is a very long wall” even though most of the wall is transparent. That invisible blind is the spacer.
3. The Maths: Which Rows Are Visible?
function getVisibleRange(scrollTop, containerHeight) {
  // How many full rows fit above the current scroll position?
  // That index is the first row peeking into the top of the screen.
  const startIndex   = Math.floor(scrollTop / ITEM_HEIGHT);

  // How many rows fit inside the visible window height?
  const visibleCount = Math.ceil(containerHeight / ITEM_HEIGHT);

  // The last visible row is start plus how many fit on screen.
  const endIndex     = startIndex + visibleCount;

  return { startIndex, endIndex };
}Picture a staircase where every step is exactly 48cm tall. If you’re standing at 960cm, you’re on step 20 — because 960 ÷ 48 = 20. That’s all Math.floor(scrollTop / ITEM_HEIGHT) is doing. Then containerHeight / ITEM_HEIGHT tells you how many steps fit in your visible window, so you know where to stop rendering.
Math.floor and Math.ceil? scrollTop is rarely a clean multiple of 48 — the user might stop at 962px, partway through row 20. Math.floor rounds down so we never skip a partially-visible top row. Math.ceil rounds up at the bottom for the same reason — better to render one extra row than to clip one.4. Render Only the Visible Slice
Now we know the start and end index — we loop across only that small range and create a real DOM element for each one. The other 49,980 items stay as plain JavaScript data.
function renderRows(startIndex, endIndex) {
  // Remove whatever rows were rendered before this scroll position
  container.querySelectorAll('.row').forEach(el => el.remove());

  // Only loop across the small visible slice — not all 50,000 items
  for (let i = startIndex; i < endIndex; i++) {
    if (i < 0 || i >= ITEM_COUNT) continue; // guard bounds

    const row = document.createElement('div');
    row.className    = 'row';
    row.textContent  = `Row #${i}`;
    container.appendChild(row);
  }
}
5. Position Each Row Absolutely
This is the step that trips people up first. If row #20,000 is the first one we render, where does the browser put it? By default — at the very top of the container. That’s wrong: row #20,000 should appear 960,000px down the page (20,000 × 48px).
The fix is absolute positioning. Every row gets top: index × ITEM_HEIGHT so it appears exactly where it would have been had we rendered everything above it.
row.style.position = 'absolute';
row.style.top      = (i * ITEM_HEIGHT) + 'px'; // ← the key line
row.style.height   = ITEM_HEIGHT + 'px';
row.style.left     = '0';
row.style.right = '0';This is why the container needs position: relative — it gives us a coordinate system. Each row is like a car in a numbered parking garage: it doesn’t need every space below it to be filled to park in space #20,000. It just parks itself directly at position “20,000 × space-width”, ignoring everything else.
6. Re-render on Scroll
Wire everything together: whenever the container scrolls, recalculate the visible range and re-render. One scroll listener, wrapped in requestAnimationFrame so it runs in sync with the browser’s paint cycle rather than flooding the main thread.
function update() {
  const { startIndex, endIndex } = getVisibleRange(
    container.scrollTop,
    container.clientHeight
  );
  renderRows(startIndex, endIndex);
}

update(); // render the initial view before any scrolling

container.addEventListener('scroll', () => requestAnimationFrame(update));
7. Overscan: The Smoothness Buffer
There’s one rough edge left. If we render exactly the visible rows and nothing more, a fast scroll can briefly outrun rendering — the user sees a flash of blank space for a split second before the next row appears.
The fix is overscan: render a small handful of extra rows above and below what’s strictly visible. When the user scrolls into that buffer zone, the rows are already rendered and waiting.
const OVERSCAN = 3; // render 3 extra rows above and below — the standard default

function getVisibleRange(scrollTop, containerHeight) {
  const startIndex   = Math.floor(scrollTop / ITEM_HEIGHT) - OVERSCAN;
  const visibleCount = Math.ceil(containerHeight / ITEM_HEIGHT);
  const endIndex     = startIndex + visibleCount + OVERSCAN * 2;

  return {
    startIndex: Math.max(0, startIndex),          // never below row 0
    endIndex:   Math.min(ITEM_COUNT, endIndex)    // never past the last row
  };
}
The Complete Code
All seven steps combined into one working file — this is genuinely all the code it takes:
const ITEM_HEIGHT = 48;
const ITEM_COUNT  = 50000;
const OVERSCAN    = 3;

// 1. Container setup
const container = document.getElementById('list-container');
container.style.position = 'relative';

// 2. Spacer for correct scrollbar size
const spacer = document.createElement('div');
spacer.style.height = (ITEM_COUNT * ITEM_HEIGHT) + 'px';
container.appendChild(spacer);

// 3 + 7. Visible range with overscan
function getVisibleRange(scrollTop, containerHeight) {
  const startIndex   = Math.floor(scrollTop / ITEM_HEIGHT) - OVERSCAN;
  const visibleCount = Math.ceil(containerHeight / ITEM_HEIGHT);
  const endIndex     = startIndex + visibleCount + OVERSCAN * 2;
  return {
    startIndex: Math.max(0, startIndex),
    endIndex:   Math.min(ITEM_COUNT, endIndex)
  };
}

// 4 + 5. Render only the visible slice, absolutely positioned
function renderRows(startIndex, endIndex) {
  container.querySelectorAll('.row').forEach(el => el.remove());

  for (let i = startIndex; i < endIndex; i++) {
    const row       = document.createElement('div');
    row.className   = 'row';
    row.textContent = `Row #${i}`;

    row.style.position = 'absolute';
    row.style.top      = (i * ITEM_HEIGHT) + 'px';
    row.style.height   = ITEM_HEIGHT + 'px';
    row.style.left     = '0';
    row.style.right    = '0';

    container.appendChild(row);
  }
}

// 6. Re-render on scroll
function update() {
  const { startIndex, endIndex } = getVisibleRange(
    container.scrollTop,
    container.clientHeight
  );
  renderRows(startIndex, endIndex);
}

update();
container.addEventListener('scroll', () => requestAnimationFrame(update));
Live Demo — 100,000 Rows
This is the exact technique above running live. Scroll inside the box — notice the scrollbar behaves as if all 100,000 rows exist, even though DevTools will show only a handful of real DOM nodes at any time.
Open DevTools → Elements while scrolling — the DOM node count stays tiny.
When to Use a Library Instead
What we built here is the core technique — and it’s genuinely what every production virtualization library is built on. But real apps hit edge cases this simple version doesn’t handle: rows of different heights, horizontal virtualization, window resize, accessibility, and framework integration. That’s when you reach for a library.
The most flexible option. Works with React, Vue, Solid, Svelte, or vanilla JS. Handles variable row heights, horizontal lists, and grid layouts. The best default choice for new projects in 2026.
Lightweight and battle-tested. FixedSizeList maps directly to what we built here. VariableSizeList handles different row heights. Good if you’re on React and want minimal surface area.
Handles dynamic content and auto-measured heights without manual configuration. The most “batteries included” option — best when row heights are genuinely unpredictable at render time.
Exactly what this tutorial built. Correct choice for: zero-dependency requirements, non-standard list layouts, deeply embedded custom rendering, or when you simply need to understand what you’re shipping.
| Need | From-scratch | Library |
|---|---|---|
| Zero dependencies | ✓ Yes | ✗ Adds dependency |
| Variable row heights | ✗ Extra work | ✓ Built in |
| Horizontal virtualization | ✗ More work | ✓ Built in |
| Accessibility / ARIA | ⚠ Manual | ✓ Handled |
| Framework integration | ⚠ Manual | ✓ Native |
| Full control over rendering | ✓ Complete | ⚠ Limited |
When You Don’t Need This at All
Virtualization adds real complexity — absolute positioning, scroll listeners, manual height math. It earns its place for large lists, but it’s overkill for small ones. A simple rule:
- Under 100 items: just render normally. The browser handles it fine.
- 100–500 items: consider pagination or infinite scroll with a smaller page size first — much simpler.
- 500+ items, continuous scroll: virtualization is the right tool.
- Chat history, activity feeds, logs: classic virtualization use case — do it.
Frequently Asked Questions
What is list virtualization?
List virtualization (also called virtual scrolling or windowing) renders only the rows currently visible on screen as real DOM elements — typically 15–20 nodes regardless of list size. As the user scrolls, those same nodes are repositioned with new data instead of creating and destroying thousands of elements.
Why is rendering a long list slow without virtualization?
Every DOM node costs memory and layout time. A list of 50,000 items means 50,000 real elements in memory simultaneously — even though the user can only see around 15. That bloats memory, slows scrolling, and makes any DOM update expensive because the browser accounts for every node.
What is the difference between list virtualization and pagination?
Pagination splits data into pages requiring the user to click to see more. Virtualization keeps one continuous scrollable list — the user never clicks to load more — but only renders the rows in view. Virtualization gives a smoother, native-feeling experience while keeping DOM cost low.
Should I build list virtualization from scratch or use a library?
For most production applications, use TanStack Virtual or react-window — they handle variable heights, resize, accessibility, and framework integration you’d otherwise have to build yourself. Build from scratch when you need zero dependencies, need full rendering control, or want to understand how the libraries actually work.
What is overscan in list virtualization?
Overscan is the number of extra rows rendered above and below the visible area as a buffer. It prevents a brief flash of blank space when the user scrolls quickly, since the next rows are already rendered before they scroll into view. A value of 3–5 rows is standard.
What You Just Built
A 100,000-row virtual list in plain JavaScript — the same foundation every production virtualization library is built on.
- A fixed-height scrollable container with
position: relative - An invisible spacer that gives the scrollbar the correct full-list height
- Division maths that converts scroll position into a visible row range
- Absolute positioning that places each rendered row exactly where it belongs
- Overscan that pre-renders a buffer so fast scrolls never show blank space
- A
requestAnimationFramescroll listener that ties it all together efficiently
The next step is variable-height rows — where each item can be a different size. That requires a height cache, a prefix-sum offset array, and ResizeObserver to measure rows as they render. Continue to Part 2 →